If you've ever thought about traveling abroad, having a Nigerian international passport is an absolute must. I remember my first experience applying for one; I was nervous, excited, and honestly a bit overwhelmed.
Between the online forms, the portal, the biometric appointment, and gathering all the necessary documents, it honestly felt like I needed a crash course just to get started.
But something made applying easier for me, I took it step by step, and I found out it wasn’t as difficult as I had imagined. The process, even though detailed, is quite straightforward once you understand what to expect.
And in this guide, I’m going to walk you through everything you need to know to apply for a Nigerian international passport in 2026, in a way that’s simple, clear, and easy to follow.
By the time you finish reading, you’ll know exactly what to do, the documents you’ll need, how much it costs, and how to avoid the most common mistakes that come up during the application processes.
Types of Nigerian International Passports
Before we dive into the “how,” it’s important to understand what type of passport you need. Not all passports are the same, and selecting the wrong type can lead to delays; or worse, outright rejection. Knowing your options will save you time, money, and stress.
There are two main types of Nigerian
international passports:
1. Standard e-Passport
The standard e-passport is by far the most common choice for Nigerian citizens. It is widely used and accepted internationally. This passport comes in two main versions:
- 32-page passport:
This version is valid for 5 years and is ideal for occasional travelers. If you travel internationally only once or twice a year, this is usually sufficient.
- 64-page passport:
This version is valid for 10 years and is perfect for frequent travelers. The advantage is clear as you won’t have to renew it as often, which saves you time and reduces hassle over the years.
Pro Tip: If you’re unsure which to pick, think about your travel habits. Do you go abroad regularly for work, study, or leisure? If yes, the 64-page passport will save you a lot of future stress.
2. Official/Service Passport
The official or service passport is primarily reserved for government officials who are traveling for official duties.
This type of passport is less common among regular citizens. It comes with specific privileges but is strictly regulated.
Regular Nigerian citizens typically do not apply for this unless they are authorized government personnel. It’s good to know this type exists, but for most first-time applicants and everyday travelers, the standard e-passport is the go-to option.
Choosing the Right Passport for You
Knowing which type of passport to apply for is an important first step in the application process. Choosing the wrong type can lead to delays, extra fees, or even having your application rejected.
For most Nigerians, especially those planning personal travel, the 64-page e-passport is the better choice. It might cost slightly more upfront, but it lasts longer and gives you flexibility for frequent travel.
Remember, the passport is not just a travel document, it is proof of your citizenship and identity internationally. Picking the right one ensures your travels are smooth and stress-free.
Requirements for Applying
Nothing slows down a passport application quite like missing or incomplete documents, so before you even log into the online portal, it’s essential to gather everything you need.
Think of it as packing for a trip, you wouldn’t leave home without your essentials, right? The same principle applies here: being well-prepared makes the process smoother, faster, and far less stressful.
Here’s a detailed checklist based on the 2025 requirements:
1. Personal Information
You’ll need to provide accurate personal details. This includes:
- Full name (as it appears on your birth certificate or previous passport)
- Date of birth
- Place of birth
- Local Government certificate of Origin
- Phone number (make sure it’s active)
- Email address (one you check regularly)
Very Important: Double-check every detail here. Even a small typo in your name or date of birth can cause delays that could last weeks.
2. Identification Documents
To prove your identity, you’ll need the following:
- Birth certificate – preferably the original or certified copy.
- National Identity Number (NIN) – mandatory for all applicants.
- Previous passport – if you are renewing.
NOTE: If you’re applying for your first passport, the birth certificate and NIN are the most important documents.
Very Important: Make sure they are valid, clear, and not expired.
3. Passport Photographs
Your photos are more important than most people realize, they’re part of your official record and must meet strict specifications.
Requirements usually include:
- Recent photographs (taken within the last 6 months).
- Colored images with a white background.
- Standard size: 2x2 inches.
- Clear and properly cropped to show your full face.
Very Important: If you can, have your photos taken at a studio familiar with NIS passport requirements. It’s much safer than trying to take them yourself.
4. Payment of Fees
Passport fees vary depending on the type of passport and number of pages.
Fees for Passport Applications within Nigeria effective since Sept 1, 2025:
- 32-page (5-year validity): N100,000
- 64-page (10-year validity): N200,000
Fees for Nigerians in the Diaspora:
- 32-page (5-year validity): $150 USD
- 64-page (10-year validity): $230 USD
Always check the official NIS portal here https://passport.immigration.gov.ng/ for the latest updates, as fees may change.
Pro Tip: Keep a printed copy or screenshot of your payment receipt, it will be required during your biometric appointment.
Extra Tip: Print a checklist of all documents and tick off each item as you gather it. Being organized will save you unnecessary stress and potential delays.
How to Apply for a Nigerian International Passport: Step-by-Step guide
Now that you’ve gathered everything, it’s time to move on to the application process itself. Don’t worry, it’s much simpler than it sounds. Below is a detailed walkthrough that will help you complete your application smoothly, from creating an account to collecting the passport.
Step 1: Create an Account on the Official NIS Portal
The Nigerian Immigration Service (NIS) has moved most of the passport application process online to make it more efficient and user‑friendly. Visit the official passport portal at https://passport.immigration.gov.ng/.
Once there, click “Create Account” and fill in your personal details, including a valid email address. Make sure this is one you check regularly because all communication, including application updates will be sent there.
Tips for this step:
- Use a strong password you can remember.
- Write down your username and password somewhere safe.
- Use your real details exactly as they appear on your official documents to avoid mismatches later.
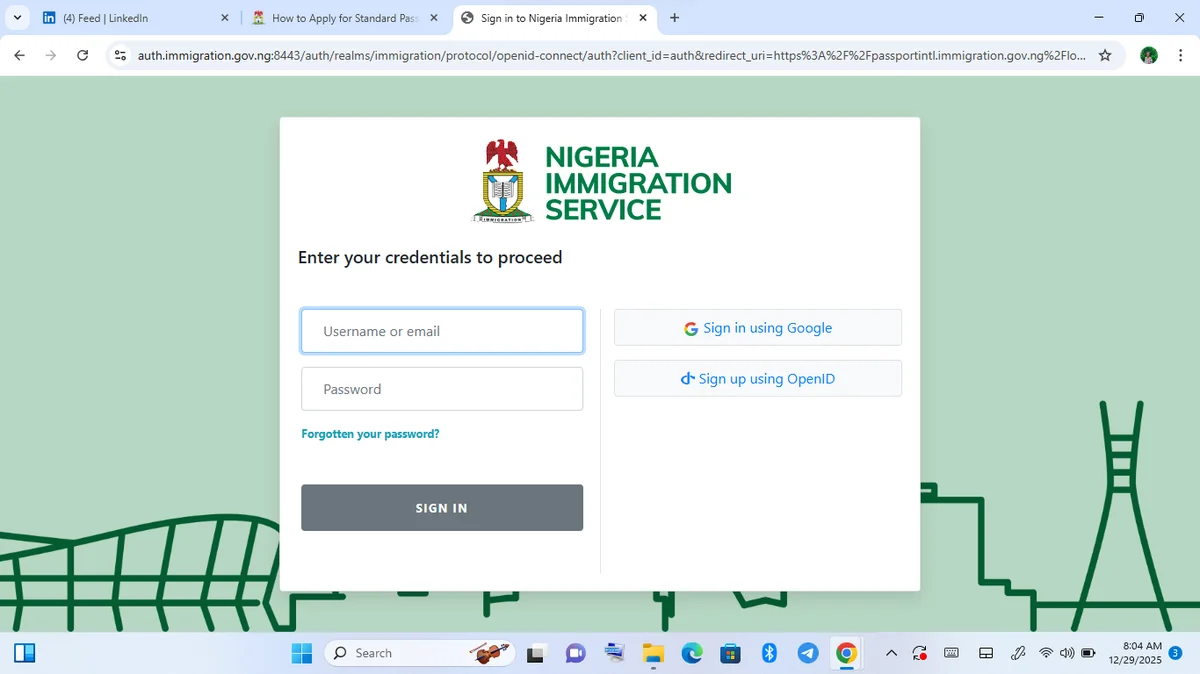
Step1: NIS login page
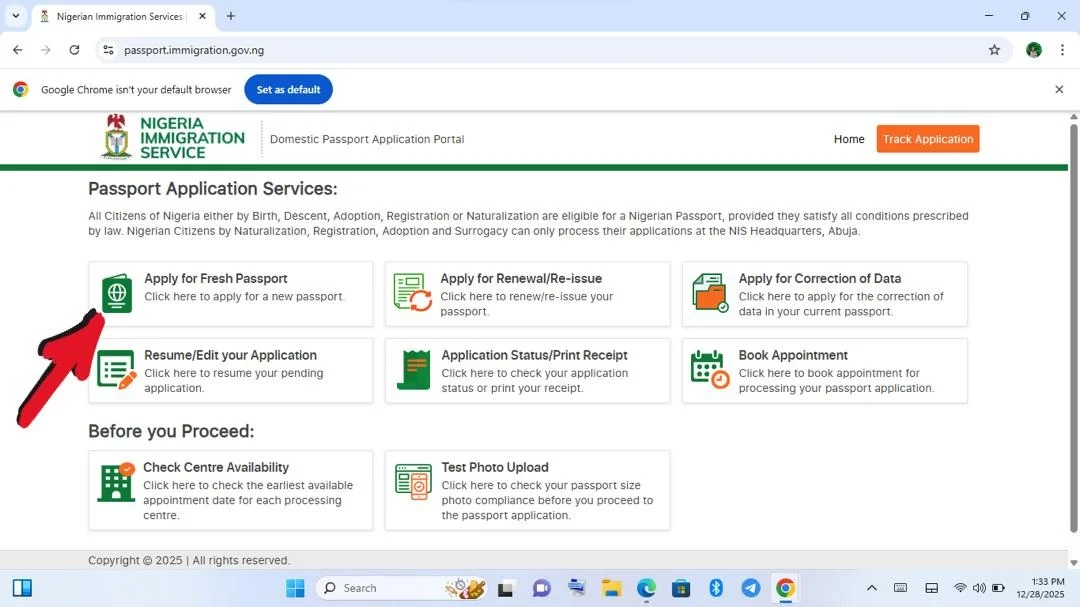
Step 2: Start Your Passport Application
After logging in to your new account, you’ll see options like “Apply for Fresh Passport” or “Apply for Renewal/Re‑issue.” Choose the one that fits your situation, most first‑time applicants will select “Apply for Fresh Passport.” This is where your passport journey officially begins.
Step 3: NIN Verification — The First Official Step
Before you go further, the portal will ask for your National Identification Number (NIN). This step links your application to your identity. Be careful here while inputting your NIN and make sure to double‑check the NIN you type in because an incorrect NIN can delay your application.
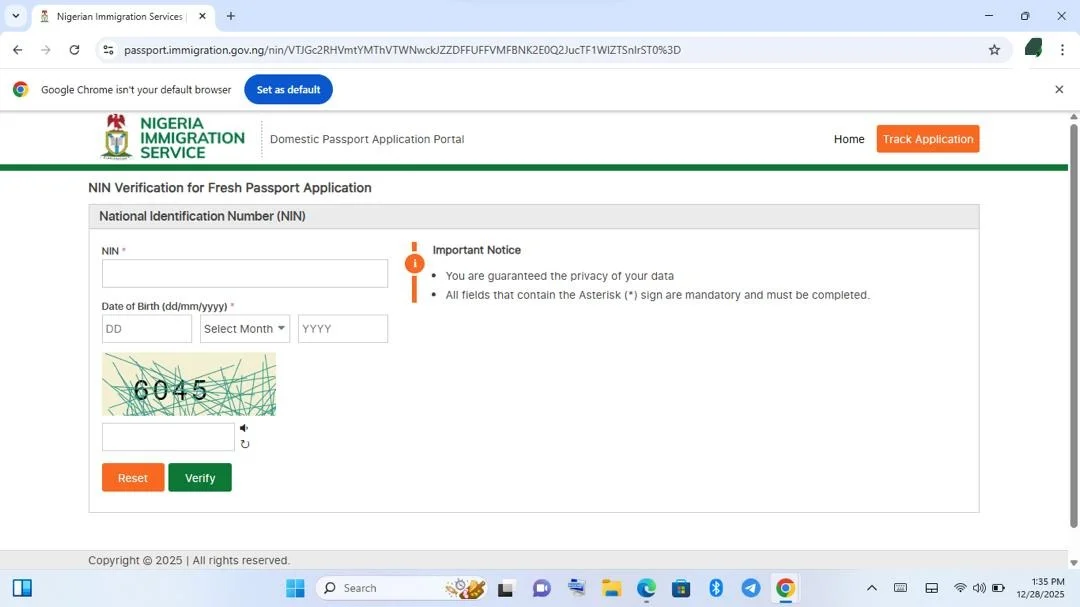
Enter your National Identification Number (NIN) to verify your identity and continue with your passport application.
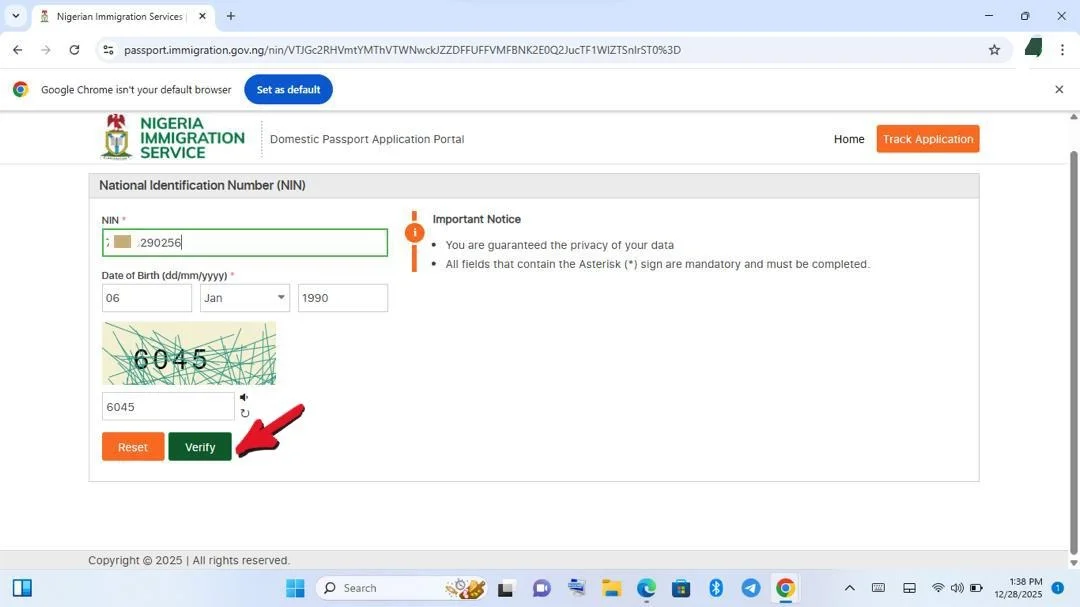
After entering your NIN, confirm your details on this screen before proceeding to the next step by clicking Verify.
Step 4: Fill in the Online Application Form
Now that your identity is verified, it’s time to complete the application form.
Here’s what to keep in mind:
- Personal Information: Enter your details carefully — full name, date of birth, address, and contact information must be accurate.
- Passport Type: Choose whether you want a 32‑page or 64‑page booklet.
- Contact Info: Ensure your phone number and email are active, you’ll receive updates here.
Pro Tip:
Most delays happen because of typos, especially in names and dates. Take your time with this step.
Step 5: Upload Required Documents
Once the form is completed, you’ll be prompted to upload supporting documents. These typically include:
- Birth certificate or declaration of age
- National Identification Number (NIN) slip
- Passport photographs (recent and compliant with NIS photo standards)
- Any other supporting document required for your application type.
Helpful Hints for this step:
- Ensure the photos meet the NIS specifications; recent, clear, and showing full face.
- Scan documents clearly; blurry or incomplete scans can lead to rejection.
- Save digital copies in a folder on your phone or computer for easy access.
Step 6: Pay the Application Fee
After uploading your documents, it’s time to pay the passport fee. Payment is made online through the NIS portal using the integrated payment system.
Do these before you confirm the transaction:
- Double‑check the fee based on your passport type (32‑page or 64‑page).
- Make sure your payment details are correct.
Save a Screenshot or Receipt:
You’ll need proof of payment when you go for your biometric appointment. It also serves as your confirmation that the transaction was successful.
Step 7: Schedule Your Biometric Appointment
Once the portal confirms your payment, you can schedule your biometric appointment at a nearby NIS office.
Tips to keep in mind:
- Choose a date and location that works best for you.
- Arrive early, because appointments are strict and missing yours could force you to reschedule.
This step is often where most applicants trip up. A missed appointment can delay your passport collection by weeks, so take it seriously.
Step 8: Attend Your Appointment
On the day of your appointment, head to the NIS office with your printed documents and proof of payment.
Here’s what to expect:
- Biometric Capture:
Your fingerprints and photograph will be taken.
- Document Verification:
Officials will review all your uploaded
documents against the originals you bring.
- Final Checks:
Any missing or incorrect details will be flagged, so double‑check everything beforehand.
Pro Tip:
Dress neatly and carry all original documents. You want this moment to go smoothly.
Step 9: Track Your Application Status Online
After the appointment is done, you can check the progress of your passport right from the portal.
Typical status updates include:
- Processing
- Ready for Dispatch
- Collected
Checking weekly helps you stay informed and avoids unnecessary trips to the NIS office.
Step 10: Collect Your Passport
Once the portal shows that your passport is ready:
- Bring your receipt and a valid form of ID.
- Visit the NIS office where you had your biometric appointment.
- Inspect your passport carefully, check your name, date of birth, and passport number.
Important:
Nothing is more upsetting than discovering a typo after leaving the NIS office. Take your time to check it before leaving the counter.
Common Mistakes to Avoid
From my experience and from talking to several first-time applicants, there are a few mistakes that seem to crop up repeatedly.
Avoiding these pitfalls can save you weeks of unnecessary waiting and a lot of frustration.
I. Missing or Incomplete Documents
This is by far the most common issue. Even one missing document, like a birth certificate or NIN slip, can delay your application. Always double-check your checklist before logging into the portal.
II. Selecting the Wrong Type of Passport
Some applicants accidentally select a renewal when they’re applying for the first time, or vice versa. Others choose the 32-page passport when they actually need the 64-page version.
Choosing the wrong category could lead to delays or redoing the application entirely.
III. Submitting Incorrect Photos
Passport photos might seem simple, but NIS has very specific requirements. Blurry, improperly cropped, or old photos can get your application rejected. It’s always best to have photos taken professionally, especially if it’s your first time.
IV. Ignoring Your Appointment Schedule
Missing your biometric appointment is one of the fastest ways to delay your passport. These appointments are often tightly scheduled, and rescheduling may take weeks.
V. Not Verifying Application Details
Typos in your name, date of birth, or contact information are surprisingly common. Make it a habit to triple-check every detail before submitting your application, because small errors can create big delays.
Pro Tip: Create a checklist of these common mistakes and tick them off as you go. Awareness and preparation are key to a smooth application.
Passport Renewal vs New Application
Understanding the difference between renewal and a new application can save you unnecessary stress.
Renewal:
This is for when your existing passport is expiring or your passport pages are full. Renewals are generally faster and simpler because much of your information is already in the system.
New Application:
This applies if it’s your first passport or your old passport is lost or damaged beyond repair. You’ll need to provide all the required documents from scratch and follow the full application process.
Tip: If you’re unsure which category applies, check your old passport or consult the NIS portal. Selecting the right category ensures your application moves forward without issues.
Extra Tips for a Smooth Application
Even if you follow all the steps correctly, a few extra habits can make your passport application even smoother:
I. Apply Early
Don’t wait until the last minute, especially during peak travel seasons. Appointments fill up quickly, and processing times may increase.
II. Organize Your Documents
Keep a checklist handy and tick off items as you gather them. Organization at this stage can save you hours of frustration.
III. Double-Check Your Details
Make sure your names, dates, and addresses match exactly across all documents. Any discrepancy can delay your application.
IV. Stay Informed
Keep an eye on the NIS portal for updates, announcements, or changes in fees. Policies sometimes change, and being informed helps you avoid surprises.
V. Be Patient
The process usually takes 2–6 weeks, depending on location and passport type. Being patient and following the steps carefully is often the best approach.
Frequently Asked Questions (FAQs)
Q1: How long does it take to get a Nigerian passport?
Typically, it takes 2–6 weeks, depending on your location and the type of passport you applied for. During peak travel seasons, processing may take slightly longer.
Q2: Can minors apply for a passport?
Yes! But a parent or guardian must complete the application and attend the biometric appointment on behalf of the minor.
Q3: Can I expedite the process?
Yes, there’s an expedited option for urgent travel, usually for an additional fee. This is helpful if you have last-minute travel plans, but it’s best not to rely on this unless necessary.
Q4: Can I apply from outside Nigeria?
Absolutely. Nigerian embassies and consulates abroad process passport applications, although it may take slightly longer than applying within Nigeria.
Q5: Can I pay at the NIS office instead of online?
No. Payments are now strictly made online via the portal, so always keep a copy of your payment confirmation safe.
Extra FAQ Tip: If you’re traveling abroad and need your passport urgently, consider applying at an embassy that offers expedited processing. This can save time, but always plan ahead to avoid stress.
Conclusion
Applying for a Nigerian international passport in 2025 might feel overwhelming at first glance, but it doesn’t have to be. By taking the time to understand the types of passports, preparing your documents carefully, following the step-by-step process given in this detailed guide, and avoiding common mistakes, you can get your passport with minimal stress.
Preparation is everything. From creating your online account to attending your biometric appointment, staying organized, attentive, and patient, these will make all the difference.
Even if this is your first passport or you’re renewing, following this guide will help ensure a smooth, stress-free process. Soon enough, you’ll be holding your Nigerian international passport, ready to explore new destinations, expand your opportunities, and experience the world.
For the latest updates and official information about Nigeria International passport, always check the NIS portal here https://passport.immigration.gov.ng/.
Travel smart, plan ahead, and enjoy the journey, because your passport is not just a document, it’s the first step to adventure.
Have questions about your passport application? Drop a comment below, and we’ll help you out!